
Damian's 2001 Yamaha DRZ-400 Dual Sport Build: Phase 1
Posted by Damian Ercole on 9th Nov 2020
You know how the story goes. You’re not really looking for a bike, but when one comes along that’s too good to pass up you jump on it. I had been looking at Suzuki DRZs for a while but I really hadn’t planned on purchasing one. Low and behold, one came around and $2,000 later I was the proud owner of a bone stock, unmolested 2001 DRZ-400S.
The Suzuki DR-Z400 is a dual-sport motorcycle manufactured by Suzuki beginning in 2000. It is powered by a single-cylinder, 398 cc (24.3 cu in), carbureted, liquid-cooled four-stroke engine. (Wiki) This one only had 2000 easy miles on the clock and it was a total creampuff of a bike. It even had the original Bridgestone “Death Wing” tires on it. They are total garbage by the way, but that’s another topic for discussion. This is where the fun begins.
I started my endless research and came up with a solid plan. I must reiterate in every blog post just how important it is to research, research, research. We always have customers who get themselves in hot water on a project simply because they didn't do enough research. Even if you already know what you're doing it's essential to collect research and formulate your plan of attack.
So at the end of the day my "plan" was to build a very reliable dual sport with a bit more power that was also more capable for off-road riding. Phase 1 would constitute the following:
- 3x3 Air Box Mod
- Air Filter
- Spark Plug
- Pillow Top Grips
- Shorai Lithium Ion battery LFX14A2-BS12
- FMF Q4 Exhaust
- FMF Powerbomb header
- FCR 39 MX Carb Swap
- TST Fender Eliminator and LED tail and turn
- Front and rear tires and tubes (SHINKO 244 Golden Boy)
- Front and rear rim locks
- Billet MX Style Pegs
- YZ250 Front Fender
- BRP Billet Top Triple Clamp with Fat bar risers
- Fat Bars
- Acerbis Bark Busters (X-Factor Handguards PN 23741-90002)
- Kick Stand Switch delete
I bought the bike and never even rode it. It went on the lift and came apart. The first order of business, and most involved, was the FCR carburetor swap. I did a bunch of research and decided I would buy a good, used FCR and then purchase the adapter bits separately. I picked a carb off eBay for $250 shipped as well as theadapter kit which was just under $100 shipped. Everything that I had to buy for the FCR came from http://www.keihin-fcr.com/.
Christof was great and really knows the FCRs inside and out. He was a true asset when I ran into problems. I did replace a couple gaskets, re-jetted the carb for near sea-level riding, and blocked the leak jet per Christof’s recommendations. I also made sure the accelerator pump squirter was pointed in the right direction and was timed properly. This is a very important step that MUST be checked before assembly. Even if you purchase a new carb, I would take a few minutes to check if it’s correct.
The entire swap went pretty well. A lot of people complain about how difficult it is and how hard it is to get the carb in and out, but if you follow a couple key steps, it’s actually quite easy. Here is what I did to make the installation a little easier.
- Don’t put the throttle cable on until the carb is in position. You don’t need to have the boots on the carb, just put the carb in its home before you hook the throttle cable up. It just makes maneuvering the carb around slightly easier.
- The throttle wheel cover must be removed before installing the FCR; there simply isn’t enough room for it on the DRZ.
- I also took the two lower sub-frame bolts out and loosened the upper sub-frame bolt so I could swing the entire sub-frame up a bit to make for more room.
- The reg/rec also came off for some additional room.
- Lastly, I took the right side, upper engine mount off and stacked it on top of the left side mount to give the throttle cable a straighter line to the carb throttle wheel.
I got the carburetor installed and moved on to the 3x3 mod and the installation of the exhaust before I put the bike back together for testing and tuning. Instead of cutting a square hole in the top of the air box, I opted to use a 3” diameter hole saw. The difference in area is less than 2 square inches. I just thought that a hole saw would do a better job than trying to cut four straight lines without removing the entire air box; and I was right. The circular hole looks like Suzuki put it there; it looks factory! The FMF header and the Q4 muffler installation was very easy and straight forward. Fitment was spot on so a big thank you to FMF for the well-made parts. I installed a new air filter, plug, and Shorai lithium ion battery before I put the bike back together.
Here goes nothing; petcock on, choke on, key on, kill switch to RUN, pulled the clutch in and hit the start button. I was surprised when it fired right up, sat there and idled. Overall, I was pretty impressed with how it ran on the stand. The throttle response was great and the carburetion seemed pretty decent. Before riding it, I did notice the throttle hanging up when the throttle was chopped. The engine would stay at a high idle until you blipped the throttle once or twice. I checked the throttle cable routing and made sure that the throttle and slide were not sticking or binding. Everything checked out so I went for a test ride.

My first impression was, WOW! The combination of the 3x3, the FCR and the exhaust was VERY noticeable. The throttle response is killer and the bike pulls really hard from down low in the RPM range. The mid-range needed some attention. It just seemed a bit flat in some spots and I did notice slight surging when at a constant throttle in the middle of the RPM range. Up top was awesome. The bike pulled really hard all the way to the rev limiter. Overall, pretty damn good aside from the throttle hanging up. This was very annoying when shifting and when coming to a stop.
After the first test ride I really needed to figure out the hanging idle. I spoke with Christof at Keihin-FCR and did a fair amount of research to try and get to the bottom of this. I read quite a bit about this issue, and it didn’t seem like there were any quick and dirty solutions, only a bunch of different things to try. I had the carb in and out several times with no success. I checked for every possible air leak, I put a new gasket on the throttle plate, bought a new throttle plate which was $94, adjusted this, checked that…all to no avail. I couldn’t get rid of the hanging idle. I also couldn’t get the carburation perfect throughout the entire RPM range. This really bothered me. Being married and having three kids, I just don’t have the time to mess around with jetting and tuning like I used to. I wanted to bolt something on and have it work like it should.
This is where I decided to look into Lectron carbs and how they work on 4-stroke applications. I had heard about them and a buddy had put one on his 2017 KTM 250XCW, but I had never had any direct experience with Lectron. I did my due diligence and researched Lectron with a fine-toothed comb. With the research I had done and the people I spoke with, I decided to make Billet Proof a Lectron dealer. I placed my first order with Lectron and was excited to finally be able to use and test one. With my first order I purchased two DRZ400 kits; one for me and one for another enthusiast.
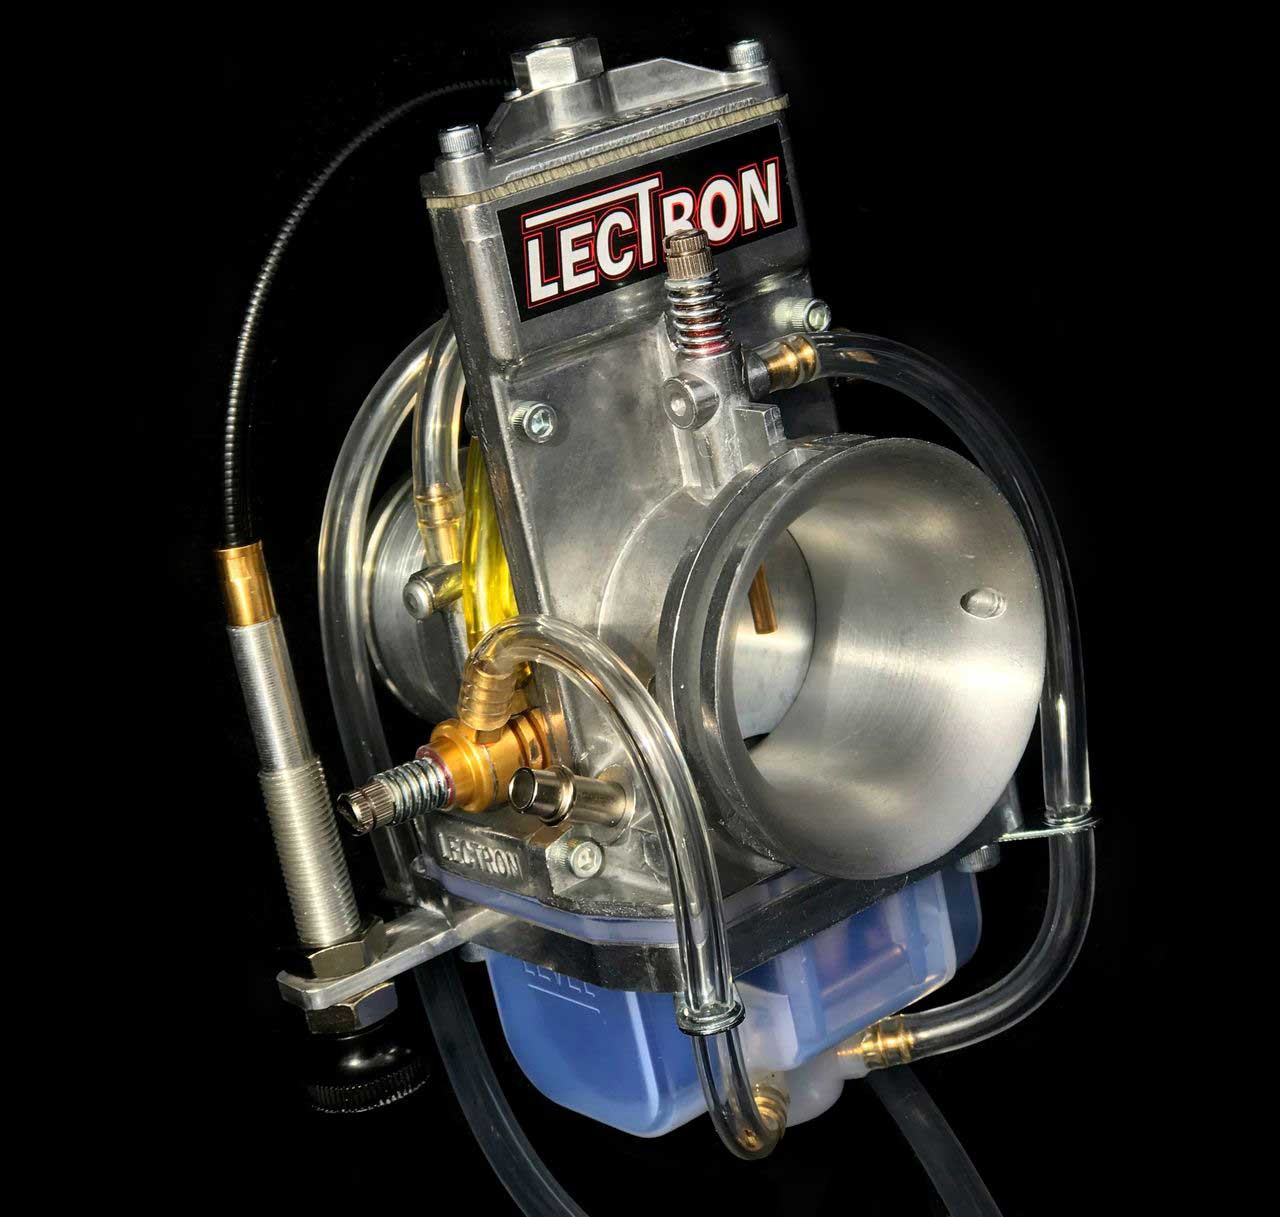
The kit is quite comprehensive as it includes the Lectron carb pre-set for the mods currently on the DRZ, Domino ¼ turn throttle, billet throttle tube, throttle cable that is designed to work with the Lectron, a couple throttle cams, and instructions for the installation of the throttle. The Lectron fits the stock intake boot and has an adapter that accepts the stock DRZ air box boot. At first glance, the Lectron carb is very nicely made with some details I was happy to see. One of those details was socket head cap screws instead of Philips head fasteners for the float bowl. The slide is very nice and operates very smoothly in the slide bore. The carburetor bowl is clear which is a pretty trick feature. Now you can see all the crap that builds up in the bowl from ethanol fuels.
I started by installing the throttle tube. This is a pretty straight forward installation provided you have some experience with throttles. No surprises here. Everything fit and operated as one would expect. Now that my confidence was high, I tore the bike down to make access to the carb. I took the FCR out put the motor mount that I had flipped to the left side, back to the right side of the bike. So to be clear, the bike has the stock upper motor mounts in the stock locations and torqued to stock specs.
I routed the throttle cable down the left side of the backbone following the large grouping of wires. I did remove one of the rubber bumpers for the gas tank to make for a straighter shot to the carb top. It didn’t seem like that rubber bumper did much since I couldn’t see where it had ever rubbed on the inside of the gas tank. I then slid the Lectron into its home with the slide out. The Lectron is slightly shorter compared to the stock CV and the FCR. The first thing I did was make sure the intake (engine) side of the carb was completely seated in the intake boot. This was easy. The air box boot was a different story. To make this job easier, I unbolted the entire sub-frame assembly. This allowed the air box boot to slide about ½” closer to the carb.
The air box boot slid right onto the carb without issue. I then rotated the carb so I had access to the top. I attached the throttle cable to the slide, installed the slide and buttoned the carb back up. I ran the clear drain tubes behind the engine and out the bottom; routing them similarly to the stock configuration. I tightened the clamps and put the bike back together. Here's a great Youtube video on the installation process I just described.
Now keep in mind I haven’t touched one single screw on the Lectron. I installed it, set the throttle free play and was now going to attempt to start it. The starting sequence on a 4-stroke with a Lectron is a bit different than you are probably used to. Set the choke, crank the bike until it fires, let it warm up on choke for a few seconds (you may need to work the throttle to keep it running), but once a little heat is in the motor you can take the choke off and it will sit there and idle very nicely.
The bike started right up and ran great. It idled nicely and the throttle response seemed good on the stand; better than I had expected from what I was reading and viewing. I shut her down with intentions of riding the bike the following day. After the kids were in bed, I took her for a ride to get some overall impressions. I honestly couldn’t believe it ran like it did. It was almost flawless; much like EFI. The carburetion was so crisp and smooth through the entire RPM range. It really was remarkable compared to the FCR. The FCR seemed like an SU carb compared to the Lectron.
That pretty much wraps up Phase 1 of my DRZ improvements. Next is to really fine-tune the Lectron and add some goodies to make it better at transporting some stuff. I’m getting tired of having to wear a backpack when riding this thing. I also want to guard it up to protect the engine cases and such as well as add a manual cam chain tensioner. Essentially just make the bike a bit more reliable.
Thanks for taking the time to read my blog post. I hope I am able to save you some money and frustration with the information presented. Have fun with your DRZ. They are a great, affordable platform with loads of aftermarket support. When taken care of they are remarkably reliable and are very capable machines. Have fun and keep the shiny side up!